A recent excavation on The Terrace exposed a classic Wellington problem: weathered greywacke dipping at 40 degrees, with a water table fluctuating with every southerly front. The contractor had planned a simple soldier pile wall, but the residual soil couldn't hold the passive wedge assumed in preliminary calcs. Our team redesigned the retention system with a multi-level active anchor array, tensioned to 450 kN per strand and locked off after a 72-hour creep test—something the original geotechnical brief hadn't accounted for. Because Wellington sits on the intersection of the Indo-Australian and Pacific Plates, anchor design here is never a copy-paste exercise. The combination of steep terrain, highly variable residual soils overlying the Torlesse composite terrane, and the ever-present seismic shadow of the Wellington Fault means that both active and passive anchors must be detailed for short-term excavation stability and long-term structural resilience. When a slope stability assessment flags a potential wedge failure behind a proposed cut, we integrate that failure surface directly into the anchor free-length geometry to ensure the grout bulb sits well beyond the critical slip circle.
In Wellington's greywacke, a 6-metre free length behind the failure plane often marks the difference between a restrained excavation and a creeping slope.
Our approach and scope
Wellington's urban form owes much to its 19th-century reclamations—the entire CBD east of Lambton Quay sits on harbour fill that was hydraulically placed and poorly compacted. As the city densified, engineers faced a recurring challenge: how to anchor retaining structures in ground that offered little natural bond strength. The early solution, developed through the 1980s building boom, was to drill through the fill and socket deep into the underlying alluvium or bedrock. That principle still holds, but modern anchor design in Wellington now incorporates NZS 3404 for steel tendon capacity, NZGS guidelines for ground anchor testing, and the seismic provisions of NZS 4203 that dictate how much ductility a restrained structure must possess. A passive anchor relies on the soil mass to develop resistance along its fixed length, which works adequately in the dense Wellington greywacke but can be unpredictable in the loose gravels of the Hutt Valley. Active anchors, by contrast, are stressed against a structural face, giving the designer precise control over the load applied to the ground. In our experience, a hybrid approach—passive anchors in the upper weathered zone transitioning to active anchors in the more competent rock—often yields the most reliable performance. This strategy becomes essential when the
retaining wall itself forms part of a building's permanent basement, where deflection tolerances are tight and long-term corrosion protection is non-negotiable.
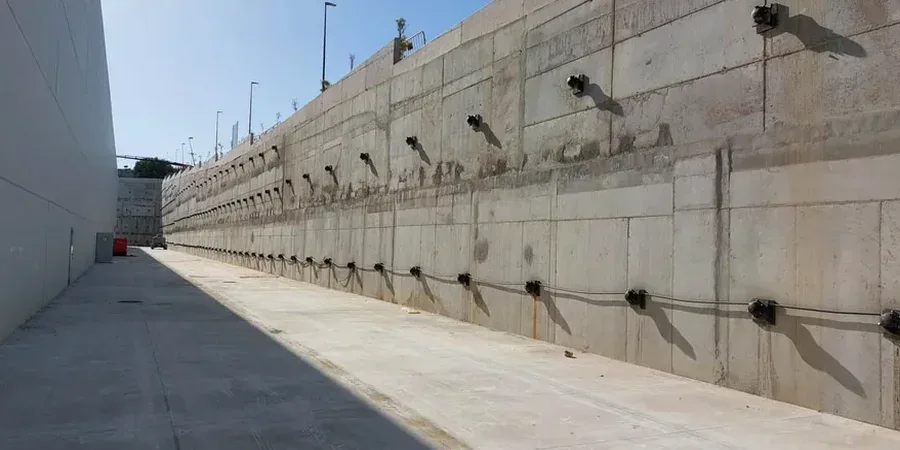
Local ground factors
A mistake we see repeatedly on infill sites around Newtown and Mt Cook is the assumption that the anchor bond zone can start immediately behind a shoring face that has been over-excavated into weathered rock. The contractor drills the hole, pumps grout, and tensions the anchor—only to find load loss within the first week. What's happened is that the grout has filled a network of open joints and fractures that daylight at the excavation face, and the effective fixed length is far shorter than the design assumed. In Wellington's closely jointed greywacke, this is a common failure mode that a simple water-pressure test during drilling would have flagged. Another risk arises when active anchors are designed without considering the thermal expansion of the steel tendon on north-facing walls—the temperature differential between a winter lock-off and a summer service condition can shift the load by 8–10%. For temporary works with a design life under two years this is manageable, but for permanent basement walls integrated into a building, the long-term relaxation and corrosion behaviour must be explicitly modelled, particularly if the water table behind the wall is brackish from harbour intrusion.
Common questions
What is the difference between active and passive ground anchors, and which one does Wellington require more often?
An active anchor is tensioned against a structural element after installation, introducing a known pre-load into the ground before any excavation movement occurs. A passive anchor only develops resistance once the ground begins to deform and transfers load into the tendon. In Wellington, we use both depending on the site constraints: active anchors dominate in the CBD where limiting wall deflection is critical to protect neighbouring buildings on shallow footings, while passive anchors are more common on hillside cuts where some gradual movement is tolerable and the economics favour a simpler installation. The Wellington City Council consent process often requires a justification for the chosen system, particularly if the excavation is within the zone of influence of the fault.
How much does anchor design and testing cost for a typical Wellington excavation?
For a standard Wellington project—say a 3-level basement in Te Aro with 40 to 60 anchors—the design, specification, and on-site testing supervision typically ranges from NZ$1,700 to NZ$5,990 depending on the complexity of the ground profile and the number of load-testing stages required by the consent conditions. Projects that need proof-load testing on every anchor plus extended creep monitoring on a selection of sacrificial anchors will sit at the higher end of that range.
How does the Wellington Fault influence anchor design in the city?
The Wellington Fault runs through the central city and is capable of producing a magnitude 7.5 event with several metres of right-lateral displacement. Anchor design in the fault-proximity zone must account for two effects: the inertial load from the retained soil mass during strong shaking, and the potential for permanent ground deformation to overstress or sever the anchor tendon. We incorporate the NZS 4203 seismic coefficients into the static load case and, for permanent works, we detail ductile anchor heads that can accommodate some rotation without brittle failure. Where the anchor crosses the fault trace itself—fortunately rare—a completely different philosophy applies, essentially designing the system to fail safely rather than resist the impossible.